What’s The Story, Muthur?
To the point, tabletop gaming
Popular Posts


The Rusted Colossus 02: | How to make Art Assets Without Being An Artist
Alongside other life things, the Rusted Colossus has been ticking away steadily in the background, and the greatest advances forwards have been in making art assets for the adventure, so that’s gonna be the topic of today’s dev diary.

By JimmiWazEre
Opinionated Tabletop Gaming Person
Now then.
Alongside other life things, the Rusted Colossus has been ticking away steadily in the background, and the greatest advances forwards have been in making art assets for the adventure, so that’s gonna be the topic of today’s dev diary.
Before I begin though, If you have no idea what the Rusted Colossus is, I strongly suggest you start with this article and then come back to this. I’ll wait - it’s OK :)
Now I want to make it quite clear that I’m not an artist, nor do I have the kind of talent of GOZR’s creator - JV West. However GOZR’s art style is simple enough for me to be able to produce something that hopefully doesn’t look too out of place. Albeit with a process that takes time and research.
So, if it doesn’t sound too presumptuous of me, I thought I’d share my process today for creating art assets. Maybe it might be interesting and informative for some of you folks? And, who knows, maybe an actual artist will read this and be able to dish out some advice if I’m making any glaring errors.
Pencil and Paper, in front of the TV with the Dog
If you’re like me, then you can’t hold mental images in your head for longer than a couple of seconds before they start fading and blurring away like sand falling between your fingers. Maybe that’s normal, maybe it’s not? All I know is that it’s my normal, and we all work with what we’ve got.
To combat this, I like to start by looking at lots of pictures, particularly if its something really complicated. The titular Colossus for example, involved looking at lots of Gundam, Warhammer 40k, and Battletech art and miniatures - grabbing all the ones I liked and then keeping images of them to hand on my phone.
Then, typically sat in front of the TV with the family, I crack out my mechanical pencil and my recycled paper A5 notepad and I start free hand transferring those basic shapes to paper, tweaking and making my own changes as I go.
Drawing lightly, and using an eraser frequently, I’ll eventually come up with something pretty sketchy which works for me. At this stage, it’s just simplistic shapes and forms really.
I found an early image of my Sand Shark, and I’m hesitant to share it because at this stage in its lifecycle looks like such garbage - but transparency is king haha.

Accomplished artists would probably have something to say about technique here I suppose. Seriously, look at that thing! Do I seem like a guy that has anything valuable to say about techniques?
Black Lining and Juicey Details
This is my favourite step actually, I like to use a Tombrow double headed water based marker (purely as it’s the cheapest one I could find in the art shop that looked suitable). Using the fine head, I very steadily and deliberately start going over my lines. I’m not copying them exactly at this point, but rather taking the time to add texture, gribblies, and the little bumps and ridges that kick an illustration up a notch.
I enjoy this step so much because it’s really not difficult, and the difference it makes to the illustration is like night and day in terms of quality.
I also like to add the heaviest shadows at this stage too, assuming the ‘sun’ is in the top left usually. Normally because I’m digging the process by this point and getting a bit too carried away and ahead of myself, but any mistakes can be resolved later.

I also added some of the accompanying text here too, but more often than not, I like to draw separate elements of an illustration on a separate sheet.
Getting It on the Computer (The Digital Bit)
I have a combination printer/scanner which I use to import my illustrations on to my computer, and an old copy of Photoshop (before they went subscription) where I do my editing.
If you’re looking to follow my methods and you lack these things, you could use freeware like GIMP instead of Photoshop, although you’d have to do your own research on how it works. Likewise, instead of a scanner, you could take a photo of your art and then email it to yourself.
Using Photoshop, like a Noob
OK, I’m not a Photoshop guru by any stretch. I picked up a copy years ago, and I used it for the absolute basics. Typically, I end up learning how to do something cool with it, and then not needing it for months at a time and forgetting everything. The joys of getting old.
Some absolute basics that you need to understand before any of this will make sense are:
Brushes
Transparency
Opacity
Layers
Transformations
For this, I’m going to have to point you elsewhere, this free Photoshop course I just found might be worth a punt.
The subheadings below cover what I’m trying to achieve.
Restoring your scanned image to pure black and white
The first issue to resolve is that your need to clean up your images, and this is a lot easier to do if they start from pure black and white.
To do this, you need to use the Threshold tool, found under Adjustments. This opens up a little graph enabling you to select a position upon it where you’re happy with the balance between white and black. As you slide the threshold left and right, your image will change, so find a point where you’re happy.

One of the unwanted consequences of this tool is that all your line work will have lost it’s soft edges, and you’ll be left with nasty pixelated lines. Not to worry, we can fix this too.
With your Threshold layer selected, go to Filter > Noise > Median and set it to about 3. You can adjust this to taste, but the effect will be that your lines get a number of new pixels added around them, fading them into the background to make everything appear smoother.
If I’m happy, I’ll merge my layers at this point. so I’m just left with my black and white image which I’ll call the Lines layer.
Delete the White
I use the manual Lasso Tool to draw around my piece, then right click, Select Inverse, and delete. Then I use the Magic Wand Tool to select any white areas that remain and delete those too. It can help to hide your background layer, as this makes it easier to see where you have areas of white remaining.
The reason that I do this step is so that when I’m making selections or using the fill tool later on, I don’t get any weird surprises caused by hidden white bits.
Making tweaks
This is a great time to bring out the eraser and brushes tool to start making any tweaks to your work. I don’t bother with a tablet for this, just a mouse and a very steady hand does the trick for me.
For me, one of the key things to look for is that any lines that started close together and have since blurred into one, are once again defined separately.
Adding light values
I come from a miniatures painting background, so I have obtained a pretty good understanding of light values over the years, if you’re just starting out - this tutorial on light and dark looks good.
In Photoshop, I start of by creating a new layer underneath my Lines layer called Grey. Then I go back up to my Lines layer, and using the Magic Wand Tool, I select on the canvas, outside of the subject I’ve just drawn, and the right click and select inverse.
It’s important not to get rid of that selection as now I return to my Grey layer, and with a mid grey selected I use the paintbrush tool to fill everything inside of it.

I then create two more layers between Grey and Lines, called Light and Dark. Keeping that selection in place from earlier to prevent us from colouring outside the lines, and selecting an appropriately lighter or darker grey, I then use a suitably sized brush to add highlights and shadows to the piece.

This is all first pass stuff at this stage, and throughout the process I go back to these layers and add more light and shadows as seems appropriate.
Sometimes I even add a lighter grey highlight on a new layer. Just keep going until you’re happy with it.
Adding Colour
When adding colour, I sometimes like to create a layer per shade I use, but it’s not strictly necessary. The important thing is that for your colour layers, to set the layer opacity to around 50% - Not the brush opacity.
That way, with your colour layers above your grey layers, 50% of the shading beneath comes through as you paint the fresh layer.

The effect can be subtle, but it’s really important to do this as the way that the light volumes interact with the colours is what gives the image depth.
Importing Additional Elements, Moving and Resizing
Mimicking the hand written aesthetic of JV West, I tend to import these extra elements as separate layers. I don’t worry about the the light values steps, but I do take the opportunity here to select little elements and move them around with the transformation tool, including resizing and repositioning them.
If you compare the coloured Sand Shark image below with the one from earlier in the post - you’ll see that the text has been moved around and resized.
Adding Effects
I think the header text tends to look good when it has a coloured Stroke effect applied. You have to make sure that the element you want to effect is isolated on it’s own layer, and then select FX and Stroke. In the subsequent menu, I can affect the colour and width of the stroke to taste.
Ofcourse, you can also use FX to add drop shadows and other wizbangs if you like!
Here’s my current iteration of the Sand Shark. It’s probably ready to be used, but I make no promises that I won’t fiddle with it some more later!

Conclusion
Do you feel up to giving it a go? If you’ve got experience yourself - do you have any tips and advice for a noob like me? Have you got any art you want to show everyone on Bluesky by linking me in it?
Hey, thanks for reading - you’re good people. If you’ve enjoyed reading this, it’d be great if you could share it on your socials, and maybe think about subscribing to the Mailer of Many Things! Either way, catch you later.
This post contains affiliate links which, should you chose to use them and buy from them, allow me to keep this site running at no additional cost to you.


Say Goodbye to Expensive Minis, Universal Monster Tokens are a literal game changer
Are you fed up of shelling out a small fortune for TTRPG minis only that you’ll only use a few times?
Do you find it a challenge to safely haul fragile miniatures with you on game night?
Do you feel restricted in your encounter choices to what you've got in your mini collection?
Is it a pain trying to hide a small plastic army behind your GM screen?
By JimmiWazEre
Opinionated Tabletop Gaming Person
Ahoy there Sailors.
Are you fed up of shelling out a small fortune for TTRPG minis only that you’ll only use a few times?
Do you find it a challenge to safely haul fragile miniatures with you on game night?
Do you feel restricted in your encounter choices to what you've got in your mini collection?
Is it a pain trying to hide a small plastic army behind your GM screen?
Yeah, not so long ago I was 100% a user of miniatures at my table and I would have answered yes to all these, (corny line incoming!) then I discovered Universal Monster Tokens (UMTs) and they changed the way I run my games for the better.
They may also have cured male pattern baldness, mid afternoon tetchiness, and a guilty desire to watch straight to DVD shark horror B-Movies. Maybe. Probably not though.
Gee Wiz Jimbo, What's a Universal Monster Token?
I’m so glad that you asked, imaginary human of culture and good taste.
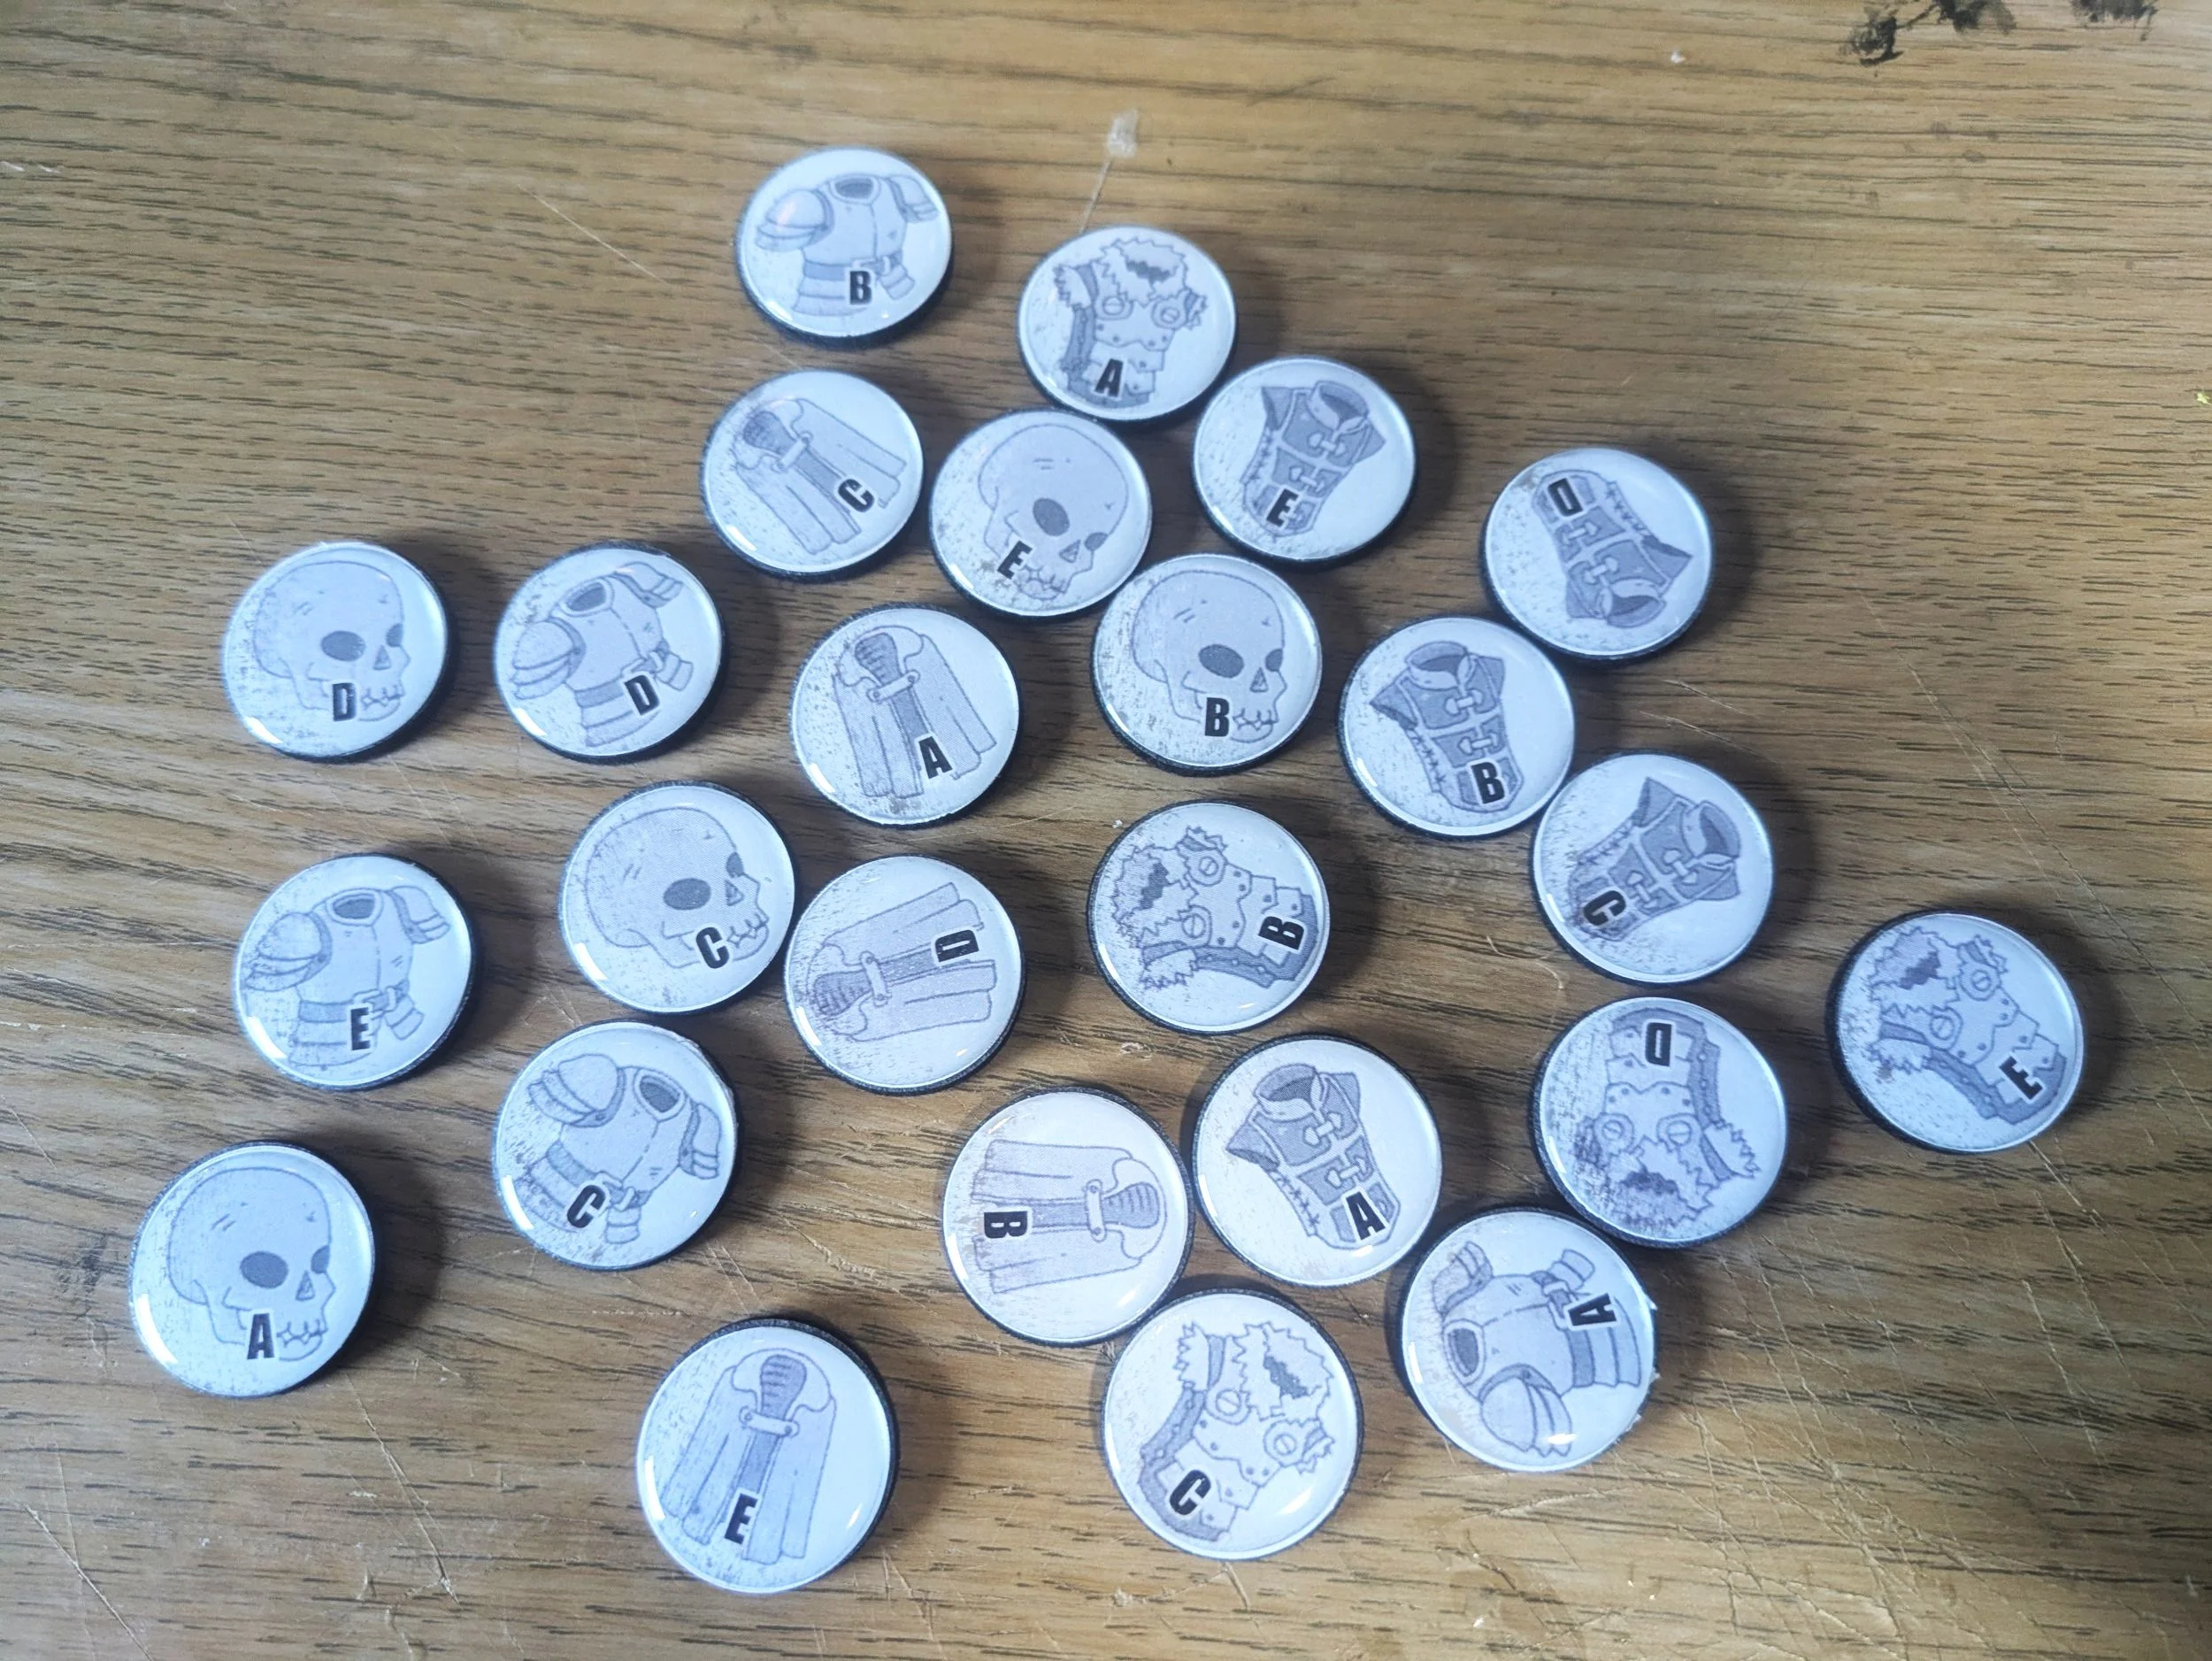
I first heard about this from Sly Flourish. UMTs replace miniatures, they’re are small 1" counters with generic TTRPG symbols and letters upon them. They're easy to store and transport, robust, cheap, and if you look after them, you'll never need to buy any additional pieces.
When you lay out a combat encounter you can simply say; “these guys are orcs with axes, and these are goblins with bows.” Since each token has a unique combination of image and letter, there's never any confusion over which monster the player characters are targeting.
Best of all, when your done, toss them in your bag and don't worry about them - they practically indestructible.
Can I buy Universal Monster Tokens?
Yep, from time to time I’ll be putting up sets on my eBay account, and when I do, I’ll include a notification on that month’s issue of the Mailer of Many Things. However, you’d be mush better off going with option two, below if you can…
I have Basically functional fingers and hands, Can I make them instead?
Yessir! You could easily make them yourself over a couple of hours if you've got access to a printer.
I have a template for a full set of 25 UMTs that you can print out on one sheet of paper, which I'm making available for free to all subscribers to my monthly newsletter - the Mailer of Many Things. Sign up today for free access to this resource and more!
You’ll only need a few additional supplies, easily sourced from Amazon or at your local hardware and craft stores:
If you buy from these affiliate links, I get a small kick back from Amazon, so it's another great way to support the blog at no additional cost to you.

What’s the step by step process?
This couldn't be easier, and it only takes an hour or so.
Print out the template, make sure that you don't do anything that causes the images to stretch or change shape. They designed specifically to fit 1" or 25mm discs.
Cut out each token carefully and accurately. I like to use a special pair of snips because it's quicker and neater than using a knife.
Stick each paper disc to a 1" floor protector, making sure the image is facing up and visible.
Carefully align and stick a 1" epoxy blob to the face side.
You should end up with a sandwich of floor protector - paper - epoxy blob.
Sweet done. Now rinse and repeat another 24 times.
Conclusion
Nice and easy right? And you don't just have to limit yourself to universal monster tokens. I also use a similar solution for my players characters tokens too. Get your players to find a small image online and then cut it out in a 1" circle.
You can even make bigger token if you like for large monsters, but in these circumstances I actually do like to use a large mini, something grand and set piece. But that's just me.
Hey, thanks for reading - you’re good people. If you’ve enjoyed reading this, it’d be great if you could share it on your socials, and maybe think about subscribing to the Mailer of Many Things! Either way, catch you later.

The Easiest TTRPG Crafting System You’ll Ever Use (and Actually Enjoy)
Crafting is one of the most tragically underbaked aspects of many TTRPGs. Take 5e for example - unless I’m much mistaken, all characters get a starting proficiency with some kind of professional gear, like alchemy, leatherworking, or brewing
By JimmiWazEre
Opinionated Tabletop Gaming Person
Hey, how’d you like our new fancy author picture-ma-doodle thingies at the top of the post eh? Fancy right? Figured that since we’ve lifted Rand Al Thor away from his wilderness survival life and put him in front of a computer, we might need to differentiate our posts a bit. News sites do this all the time. If it’s good enough for The Guardian, it’s good enough for DMT.
Anyway, now that we’ve confused everyone who came here looking for fantasy news and not my feverish ramblings—let’s talk about my crafting homebrew doo-hickie, and why you should use it to increase your player engagement or some other headline grabbing fancy.
Also I have the flu, and the medication is making me peculiar.
Why don’t you see many crafting rules?
Crafting is one of the most tragically underbaked aspects of many TTRPGs. Take 5e for example - unless I’m much mistaken, all characters get a starting proficiency with some kind of professional gear, like alchemy, leatherworking, or brewing - but then there’s no supporting procedure for actually using these skills to craft things outside of things like Kibbles’ Crafting Guide.
I’d guess one of the reasons for this would be that crafting can easily become very complicated, from a simulation perspective I can see that very clearly there’s a number of hairy things to consider:
Everything would have reagents to create it
Everything has a recipe
Everything is a recipe of reagents
Reagents would come in different volumes and quantities
Some reagents would serve as a good enough proxy for another like stream water and lake water
Inventories would get out of hand
Already it’s seeming overwhelming, and though I’m quite sure that there’s a subset of you rubbing your hands together at the notion, I’m personally on the verge of a hernia thinking about this level of codified granularity.
[Editor’s note: more flu meds required.]
Why Should We Even Bother with Crafting?
So then, why even hint at crafting in a game if it’s not developed? What are the benefits of crafting? Well, actually a good crafting system supports play in a number of ways:
Questing fodder! Travel around the land to collect the necessary reagents to make a powerful weapon/potion/armour
Game economy! Weapons and armour can be damaged, so crafting can be used to repair stuff
Player creativity! I wish we had a potion of invisibility so that we could get past that giant spider, oh wait, we can make one!
Player survivability! We can cook what we hunt to give us temporary bonuses
Jimmi, Surely there Must Be a Better Way?
You darn tootin’ there is. This is how I approach crafting in my game, without making it something overly complicated on my fragile flu-ridden geriatric millennial brain.
Ingredients
To start with, I make heavy use of abstraction. In fact, all possible types of crafting components that someone might gather I’ve condensed down into d6 reagents to reduce bookkeeping and to keep it in line with the most excellent pips inventory system I talked about back in January.
As GM, if you’re ever put on the spot for how to make a given potion (damn those pesky players with their questions!), roll a few times on this table, or just pick what seems logical. The more valuable the end product is, the more reagents it requires:
d6 | Reagent| Example
1 | Stinky Herbs | Any plant material
2 | Gooey Bits | Stuff like eyes of newts, or giants fingers
3 | Mecha Widgets | Refined items like cogs and string and sheet metal
4 | Raw Chunks | Unrefined things like ore and wood
5 | Beasty Meats | Edible meat from creatures
6 | Lumpy Fluids | Blood, venom, tears, swamp water

It’s important that you’re up front with the players where they might find certain things, for example, if the recipe for a magic potion calls for Lumpy fluids and the players haven’t yet found any, you might suggest a visit to the local swamp, or going on a zombie killing spree for their gooey bits,
Gathering
Gathering reagents slots nicely into the kinds of activities players like to undertake during travel or rest - such as hunting for dinner, or gathering herbs. If Orban the Barbarian wants to hunt that deer and succeeds, his reward will be Beasty Meats.
Additionally, borrowing heavily from videogames, I like to give out these crafting items as loot too for when characters are rifling through bodies or raiding barrels and chests. Killed a beholder? You find some Gooey Bits.
When it comes to abstraction like this, you need to let go of stressing over details. Zombie blood is just as good as swamp water when it comes to Lumpy Fluids. If your players can handle the abstraction of rolling a dice to swing a sword, then this should be within reach too.
Processing
So your mighty player characters know what they want, what they need, and they’ve collected everything together. Now we need to make the thing! For me, this is again a simple solution:
If the player is trained in the skill, and has the gear and free time (such as during a rest) then they succeed in making the thing. No roll or complicated nonsense required. I mean, sure, for some things you might want to ham it up, such as brewing a potion under the light of the full moon, but for most things, it doesn’t need to be more complicated than ensuring that characters have the skill, equipment, and time.
Failing these requirements, the player can make use of artisans in town - such as blacksmiths to make them suits of armour and swords, or witches to brew potions. Maybe there’s a legendary wizard that lives somewhere in the wilds who can make magical items for the right price and ingredients?

Conclusion
Told you I like to keep it simple didn’t I? I find this hits the sweet spot of letting players do the crafty stuff that they’re itching for, without slowing down the game or creating a boat load of accounting. Win.
Hey, thanks for reading - you’re good people. If you’ve enjoyed reading this, it’d be great if you could share it on your socials, and maybe think about subscribing to the Mailer of Many Things! Either way, catch you later.

Welcome Rand Al Thor: The Domain of Painting Many Things
The tabletop hobby is broad and the mainstay of my enjoyment comes from painting the various little creatures of my imagination that have been made manifest in this golden age of the miniature hobby.

By Rand Al Thor
In-house Painting Chap
Ahoy, my name is Rand Al Thor, and I have recently joined the “Domain of Many Things” blog family.
The tabletop hobby is broad and the mainstay of my enjoyment comes from painting the various little creatures of my imagination that have been made manifest in this golden age of the miniature hobby.
My journey began as many do at a young age with my introduction to Games Workshop through the medium of Hero Quest and over the years I’ve dabbled with (lost at) various games systems.
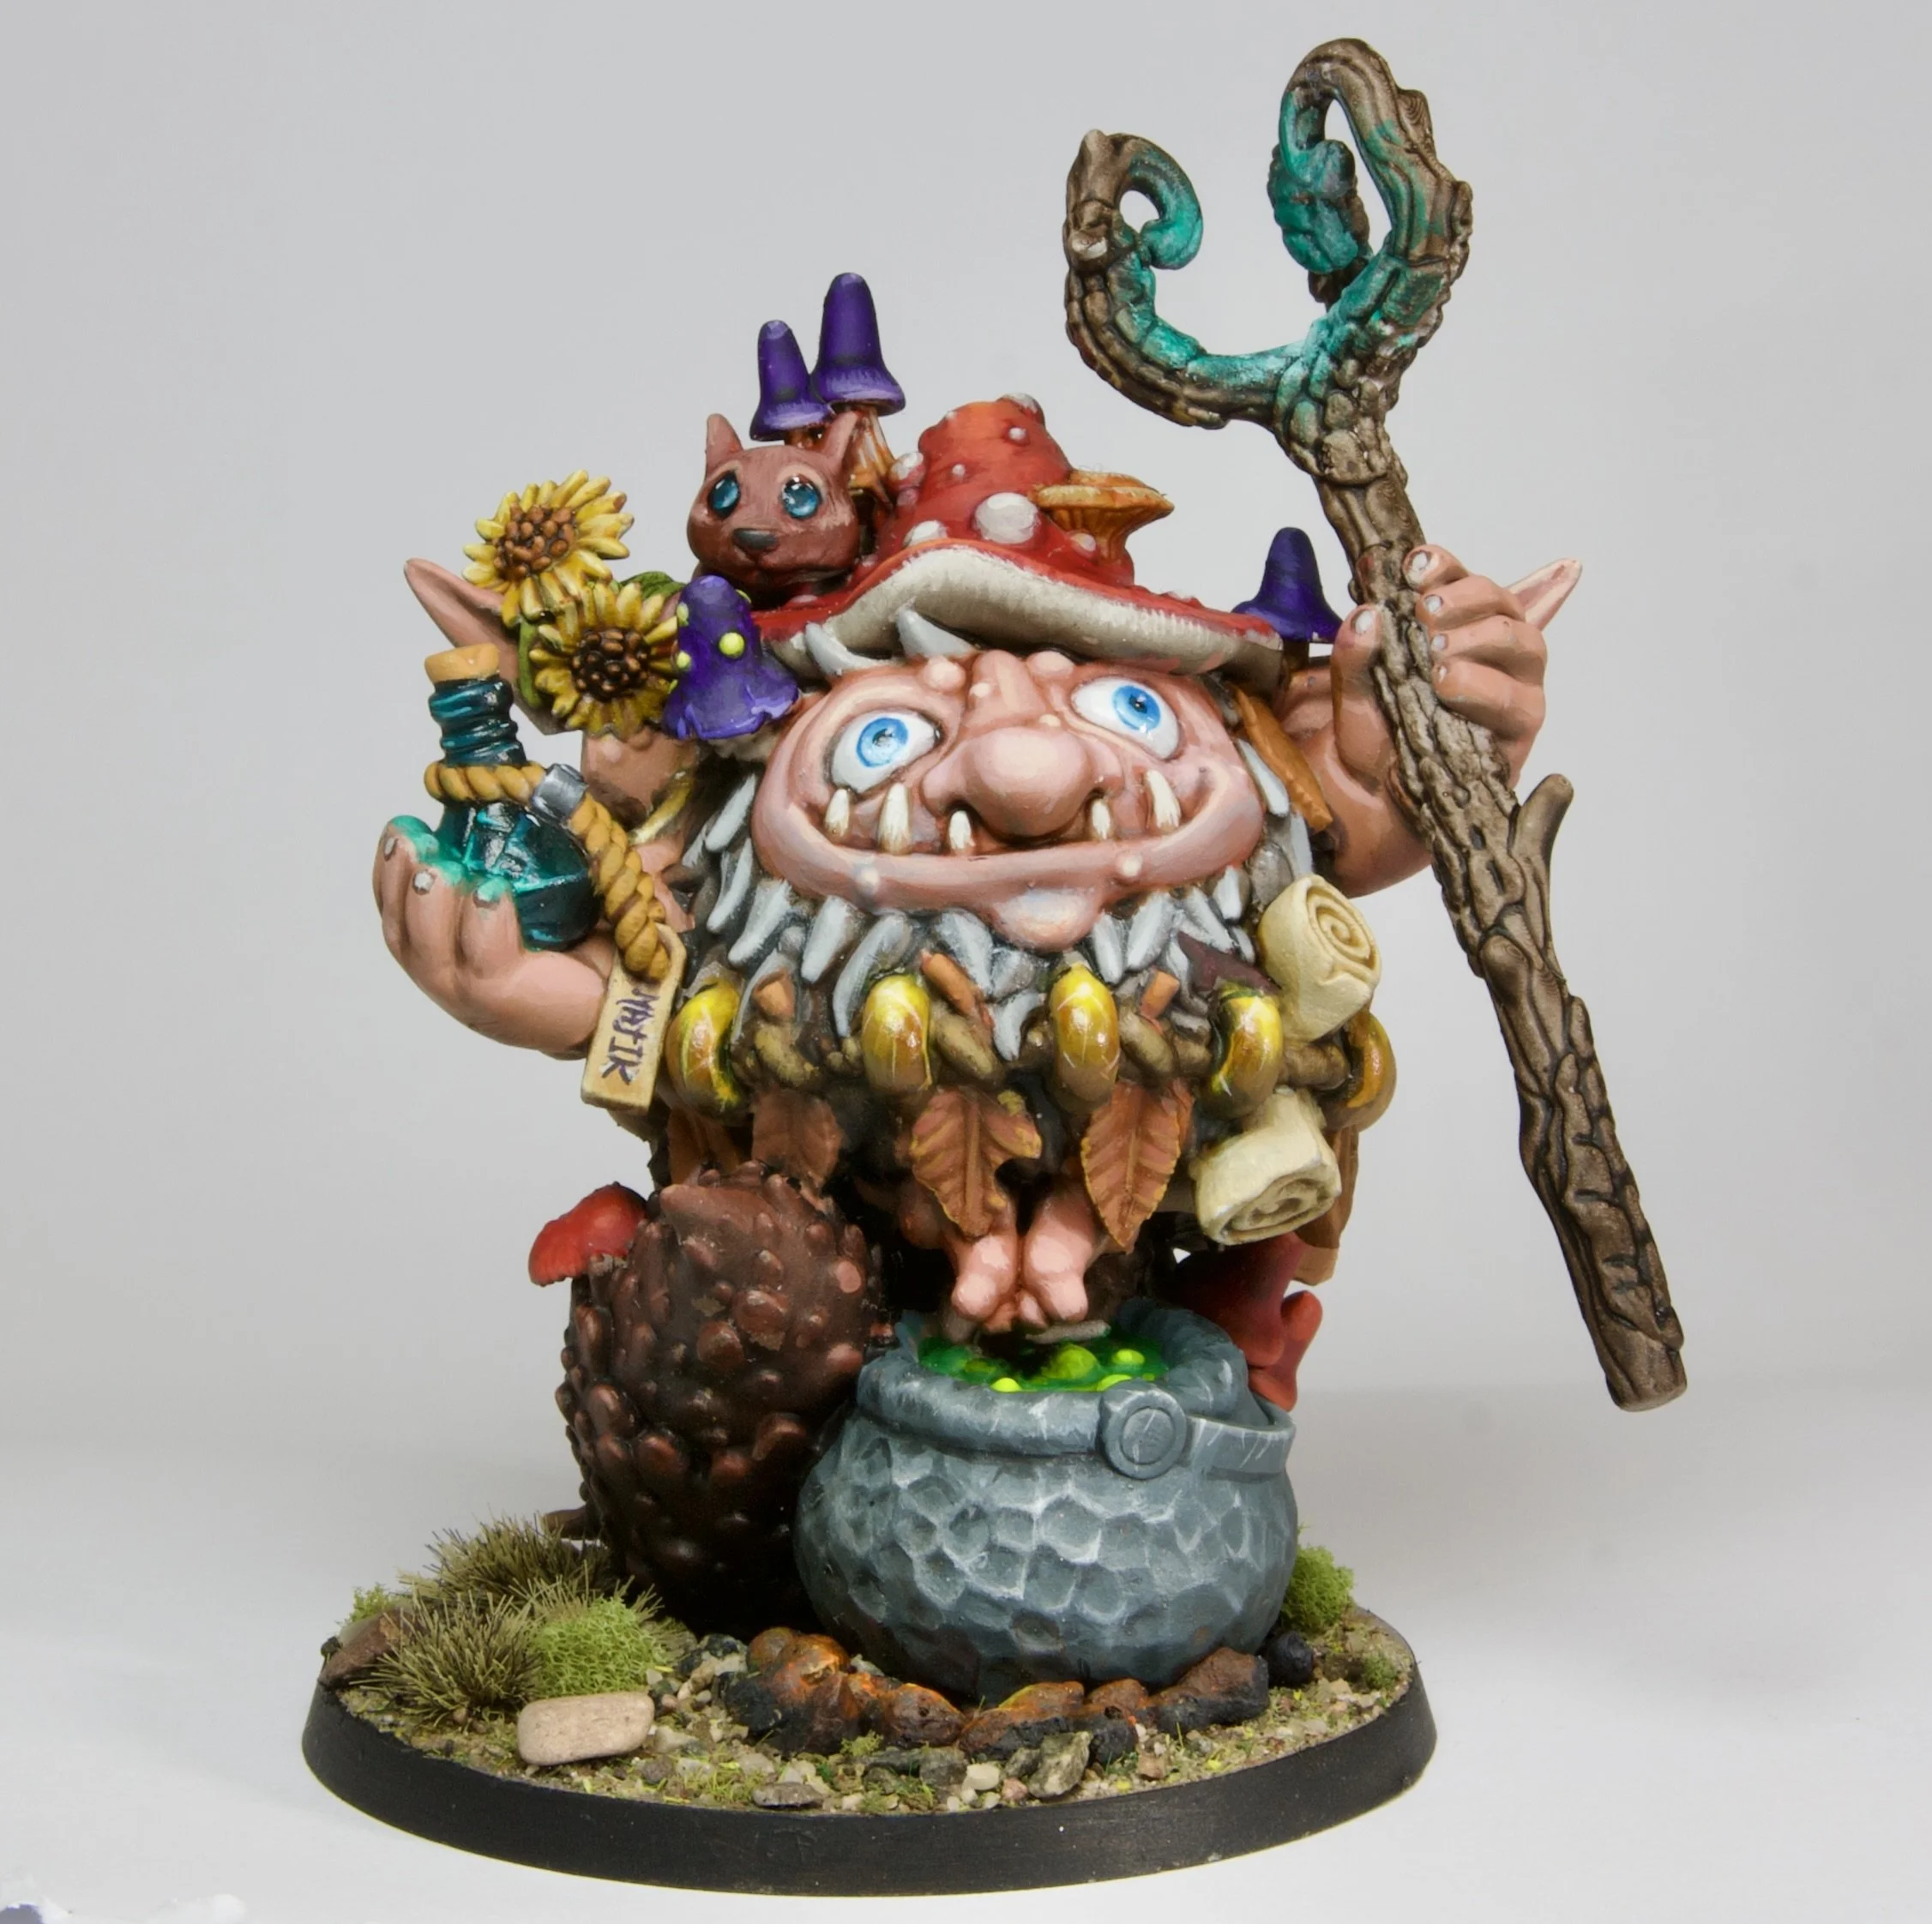
Image Credit: Rand Al Thor
I’ve painted and played with miniatures from a range of systems and genres. Fantasy, historical, sci-fi and steampunk inspired games have all crossed my painting desk and kitchen table. I guess the term hobby butterfly could be fairly accurately applied to me.

Image Credit: Rand Al Thor
As spare time has dwindled I have found painting to increasingly be my escape from real life stress into the fantastical worlds that fill my imagination.

Image Credit: Rand Al Thor
hopefully over a not too infrequent series of posts I will impart some of my passion for miniature painting, the games I play and the occasional tip or technique to help that I’ve picked up over the years.
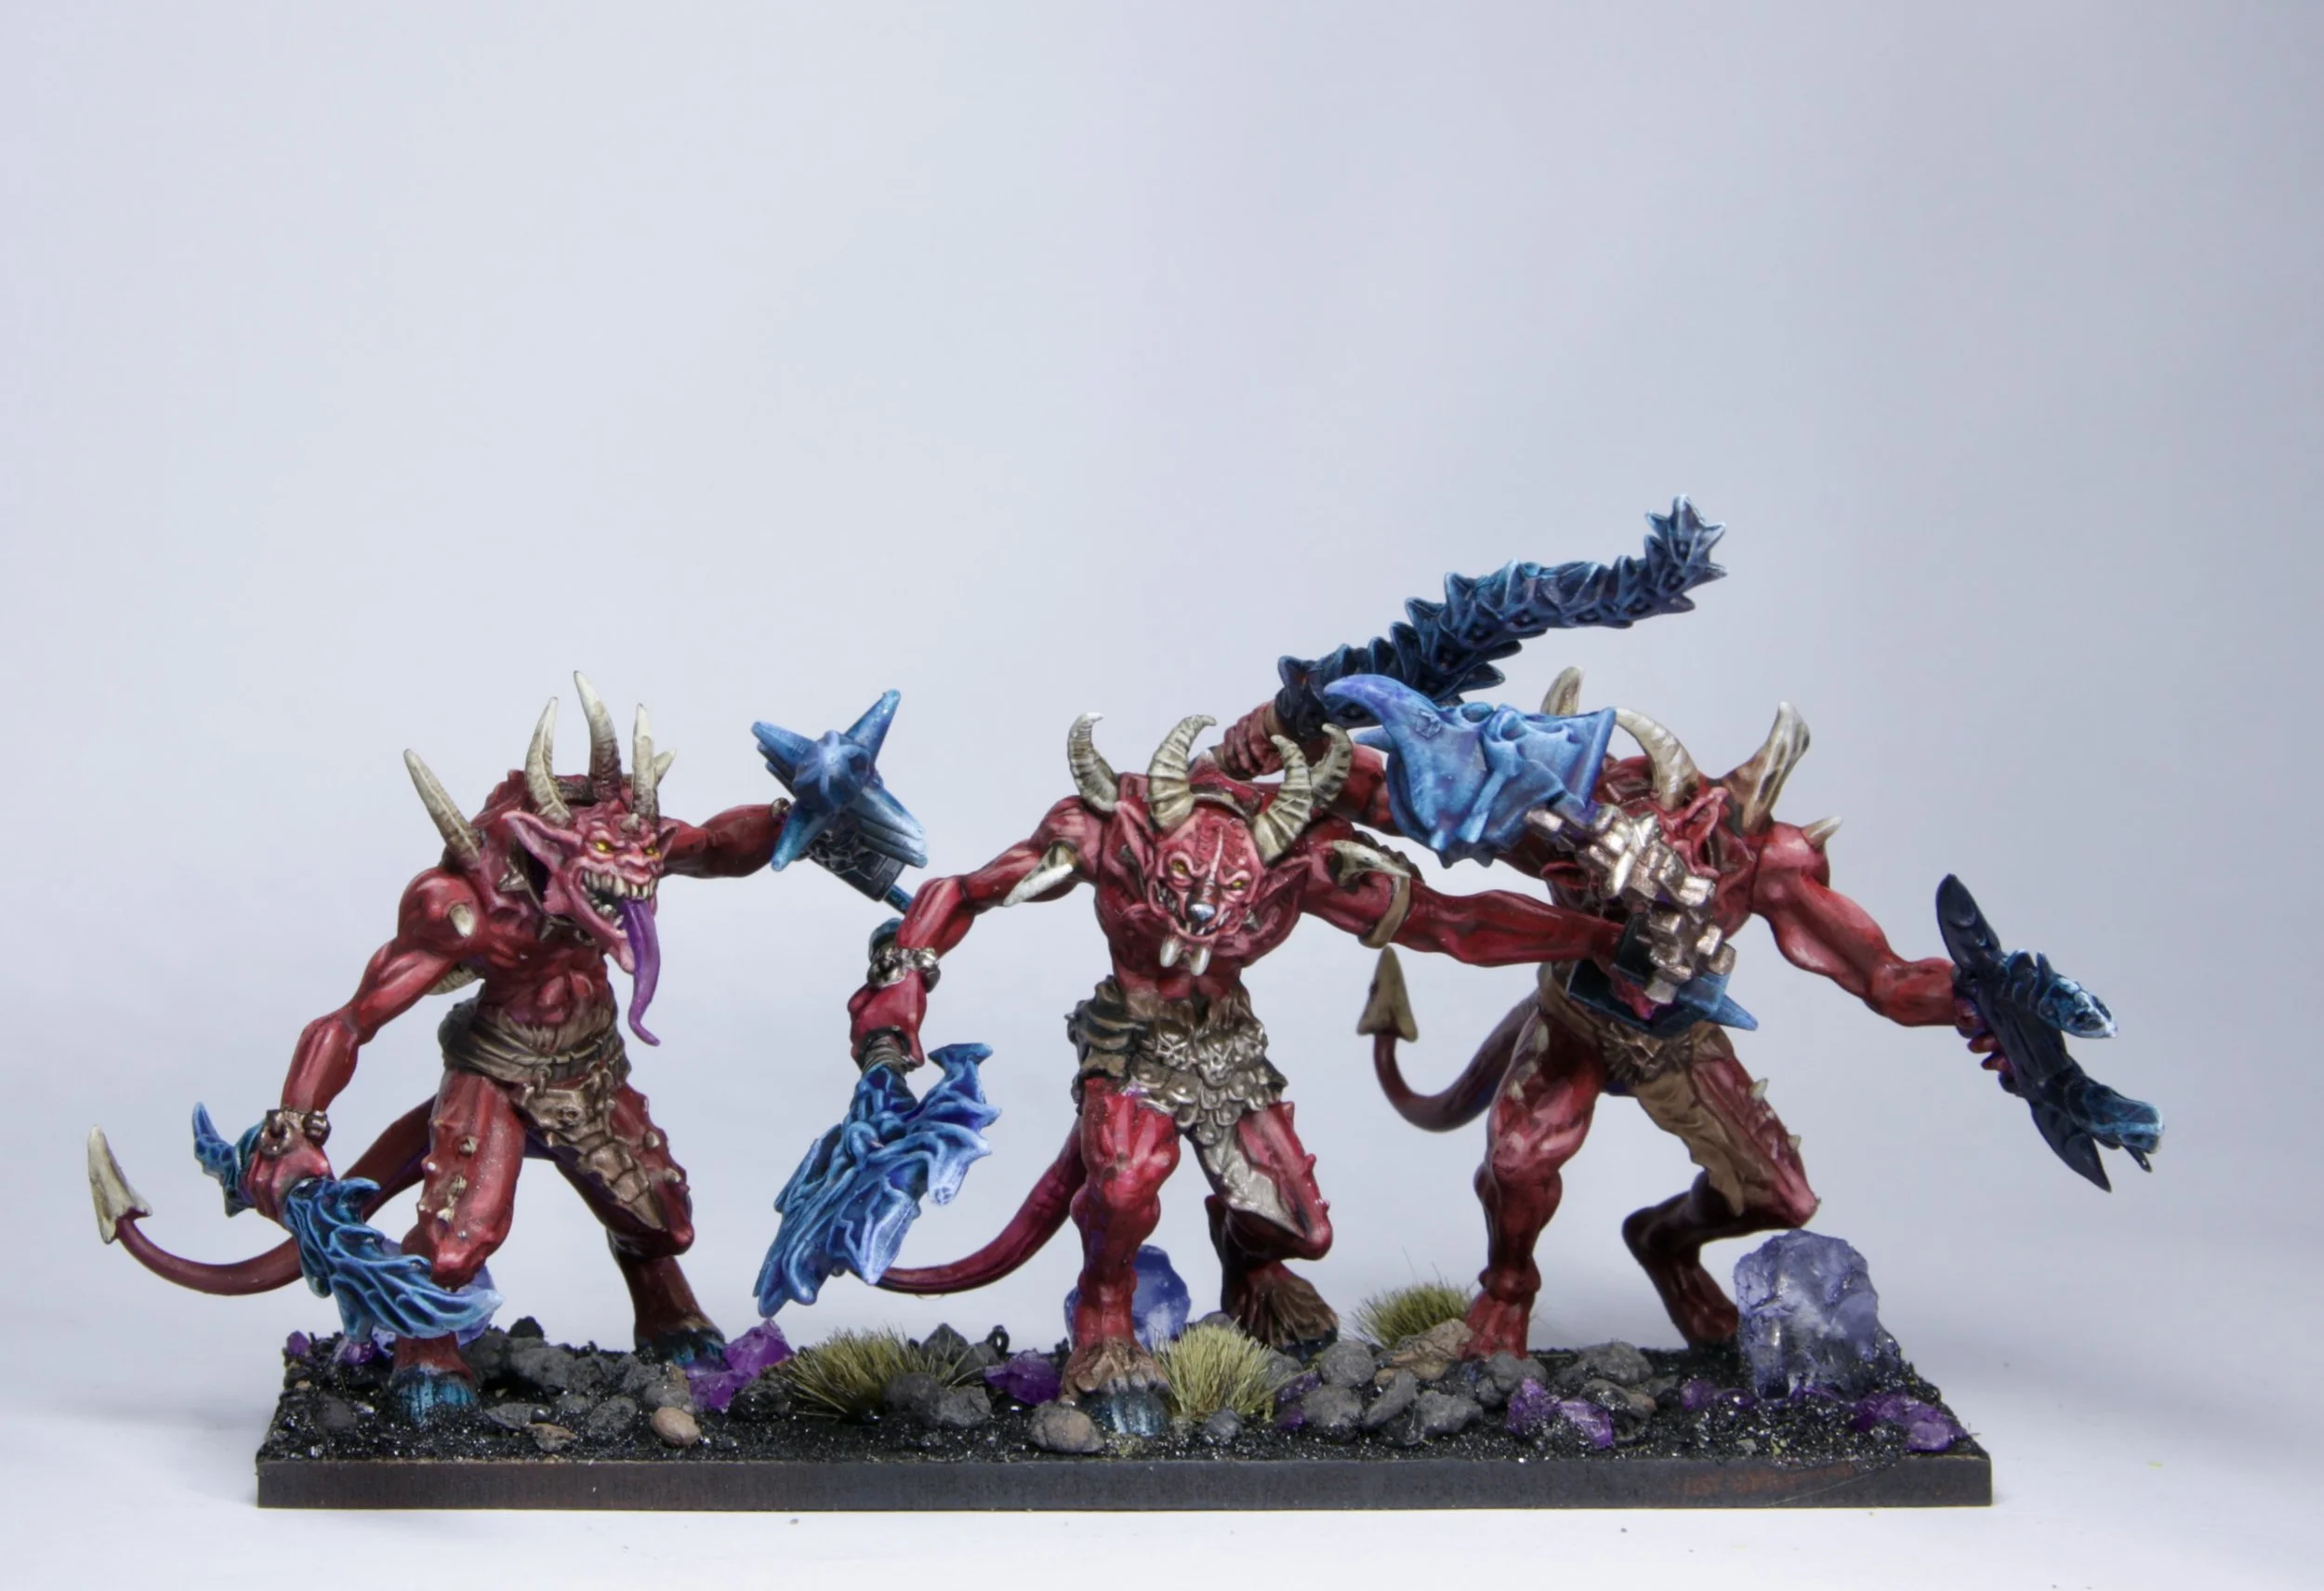
Image Credit: Rand Al Thor
Currently on my table are some Kings of War miniatures, a Warmachine Cygnar Warjack and some 10mm fantasy troops and terrain, keep an eye out for some uploads on these soon!
So, thanks for reading and I look forward to sharing the next things from my painting domain with you. Feel free to reach out to me on Bluesky if you have any questions about my work, or suggestions about what you'd like to see from me next!

Exploding dice: Make combat faster and more exciting with this one simple house rule
When you roll the highest number in a given dice for damage or healing, you get to roll another dice of equal value. This stacks, meaning every time you roll max damage, you roll another die, potentially indefinitely.
Word up my dice squirrels. Todays tip is short and sweet, like a caramel coated Gimli son of Gloin.
A common complaint about crunchy tactical combat games like 5e and Pathfinder is that battles can become a slog.
There are a number of things that you can do about this, such as using more interesting situations for combat encounters, lowering everyone's HP, unbalancing the encounters, and telegraphing monster attacks. But I also have a neat little house rule I use that's really simple to incorporate.
Damage dice explode, for everyone
When you roll the highest number in a given dice for damage or healing, you get to roll another dice of equal value. This stacks, meaning every time you roll max damage, you roll another die, potentially indefinitely.
This adds an element of unpredictability to combats, and it's a more satisfying critical hit than the traditional natural 20 approach. It also means that it's technically possible, though very unlikely to one shot something big and hairy, with unlimited possible exploding dice.
In fact, we also use the traditional house rule that a natural 20 equates to max damage, this compliments my rule because max damage neatly triggers the exploding dice house rule too.
Nothing beats the moment a player rolls an exploding die, then another, then another - the whole table erupts. And just when they think they've peaked, BOOM, another max roll! No one stays in their seat when that happens. But of course, the dice gods giveth and taketh away. The first time a goblin crits and it suddenly snowballs into a knock down? That’s when the real fear sets in.

There's another benefit too, it further differentiates the weapons in a satisfying way. Big weapons with bigger dice do more damage on average, but smaller weapons like a dagger are more swingy because they have more chance of an explosion, not only is this really thematic and satisfying, it also keeps these smaller weapons very relevant.
Conclusion
And that's it, I did tell you it was simple! Give it a go, I think you'll love the effect, and be sure to tell me how it went!
Hey, thanks for reading - you’re good people. If you’ve enjoyed reading this, it’d be great if you could share it on your socials, and maybe think about subscribing to the Mailer of Many Things! Either way, catch you later.